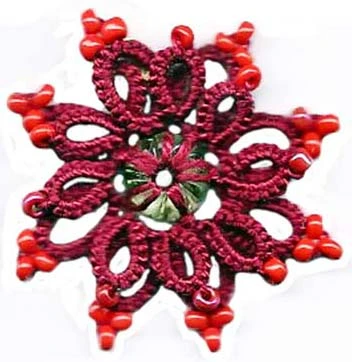
This Beaded Poinsettia measures about 1.25″ tatted in size 8 Pearl Cotton from DMC.
I bought an assortment of beads at Big Lots for $2.00 this week and there are all sorts of wonderful beads in it. The bead in the center if this flower is one that just called out to me when I saw it. It is a delicate green color with swirls and has a slightly larger than normal hole in the center, like a donut bead.
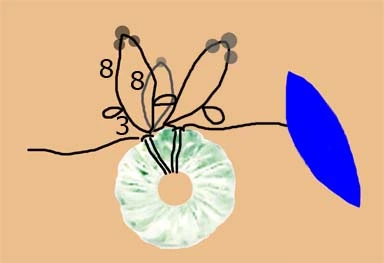
Begin with 32 seed beads on the shuttle thread. Make a loop of thread between the shuttle and ball, and then insert this loop through the hole in the center bead. Next put the bead through the loop and pull it snug. This forms a DS on the bead as shown in the diagram below. Note: Cut the thread between the ball and shuttle leaving about 12″ of tail which will be used later.
Ring: (3 – 8 B B B 8 – 3 ) do not RW
Ring (8 B 8 ) do not RW
Ring: (3 + 8 B B B 8 – 3 ) do not RW
Join to center bead by doing one split chain stitch ( also called a Catherine wheel join) Or if you don’t know how to do that a shuttle join will also work, but it won’t look the same.
Ring (8 B 8 ) do not RW
Ring: (3 + 8 B B B 8 – 3 ) do not RW
Ring (8 B 8 ) do not RW
Join to center bead by doing one split chain stitch ( also called a Catherine wheel join) Or if you don’t know how to do that a shuttle join will also work, but it won’t look the same.
Ring: (3 + 8 B B B 8 – 3 ) do not RW
Ring (8 B 8 ) do not RW
Ring: (3 + 8 B B B 8 – 3 ) do not RW
Join to center as before. Repeat around until there are eight large petals, joining the 8th one to the 7th and the 1st. There will be 7 small petals.
Tat the 8th small petal. NOTE: None of the small petals join to any other ring. Then cut the shuttle thread leaving a 12″ tail. Pull the tail to the back of the piece and tat ring whithout a bead on it. This ring is used to add a jump ring to attach it to an earring finding or a necklace cord. Note: A split ring with the first half tatted as a normal ring, and the second half tatted over both the core thread and the thread end from the first half will hide one end leaving only one end to sew into the tatting. Leave a “helper loop” of the shuttle thread after the last ds is tatted with it, then lay it next to the core thread to tat the second half of the split ring. Close the ring by pulling the core closed using the helper loop, then pull the shuttle thread end through completely.
Work in the thread at the top of this ring, then cut both ends close to the work The first end is hidden in the stitches of the second half of the split ring.
The rings are Large Small Large join, SM LG SM join, L S L join, S L S join, etc. All of the large rings are joined together around. The small rings are all in front of the large ones. Some people were having trouble with the PDF files, so this post is just HTML. If you would prefer a PDF file it will be available later on this week.

